
Point Cloud Registration Guide
Applicable software: Lixel Studio (point cloud editing module)
Intended users: surveying and modeling users for whom Map Fusion is not usable, or who need to split and process large scenes.
Overview
Point cloud registration refers to post-processing alignment in Lixel Studio of multiple point cloud results that have already been generated, so that they are unified into the same coordinate system and stitched into a complete scene.
Difference from Map Fusion:
- Map Fusion: relies on capturing according to the specification (RTK enabled, tie points with the same name placed, 15 m of overlapping trajectory), and the software registers automatically based on coordinates or tie points. It imposes strong constraints on capture quality.
- Point cloud registration: targets point cloud results that have already been generated and aligns them afterwards based on overlapping features. It does not require the capture stage to meet the fusion specification. It is a fallback when fusion cannot be used, and also a way to stitch large scenes after they are processed in groups.
When registration is needed
Point cloud registration is mainly used in the following situations.
Map Fusion was not captured per specification and cannot be recaptured
During capture, RTK was not enabled and no tie points with the same name were placed between adjacent data segments, and the overlapping trajectory is only a few meters, so Map Fusion cannot be used; meanwhile the site has been vacated or recapture is not possible. In this case you can only register the point cloud results that have already been generated.
A large scene exceeds the Map Fusion limit
- The processing limit of Map Fusion in Lixel Studio is 10 maps / 200 minutes. Large scenes exceeding this limit are not guaranteed to be processable. When a user still gets an error, the only option is to split into several groups and complete Map Fusion separately. The grouped fusion results are affected by the edge accuracy of each group and often cannot be stacked and merged directly; registration is needed to align group to group.
- Display limit: the software has an upper limit on the number of points it can display, currently 4.3 billion. Point clouds exceeding this will not be displayed in full.
The result needs absolute coordinates, but some maps lack correct absolute coordinates
The result requires absolute coordinates, but the following situations cause some maps to be unable to obtain correct absolute coordinates directly:
- The App coordinate system was set incorrectly during capture, making that map's absolute coordinates wrong;
- Some maps, limited by field conditions, could not capture RTK or place absolute control points and have only relative coordinates.
In this case you can register these maps against a reference map that has correct absolute coordinates, passing the correct absolute coordinates over through registration (see the coordinate handling section).
Choosing an approach
| Situation | Recommended approach |
|---|---|
| Site can be recaptured and the limit is not exceeded | Recapture per specification first, use Map Fusion |
| Cannot recapture, not captured per specification | Point cloud registration |
| Exceeds the 10 maps / 200 minutes limit | Grouped Map Fusion + inter-group registration |
| Some maps lack/have wrong absolute coordinates, result requires absolute coordinates | Register against a reference map with correct absolute coordinates to pass coordinates over |
Prerequisites and principles
Core principle
The point clouds to be registered must have an overlapping region, and within that region there must be identifiable common features. Registration is based on these common features, not on coordinates, so the amount and quality of overlapping features directly determine whether registration succeeds.
Requirements for overlap and features
- Keep an obvious overlapping region between adjacent point clouds.
- The overlapping region should contain clear, easily identifiable geometric features (such as wall corners, columns, steps, equipment outlines).
- Avoid using only large flat planes, weak-texture areas, or repetitive structures as the basis for registration; such areas lack uniqueness and easily cause misalignment.
Definition and selection of registration points
A registration point is the same actual location corresponding across different maps. Registration solves the rigid transformation between maps using multiple registration points, so the quality of the selected registration points directly affects registration accuracy.
Selection principles:
- Choose positions with obvious, easily identifiable features, such as the corner points of a landmark, or the outline points of an object with high reflectivity and a clear outline.
- Use as many registration points as possible, distributed in different positions of the overlapping region, avoiding concentration in one place.
- After adjustment, review the registration report, remove registration points with large errors, and reselect at other positions.
Registration points by scene type
Different scenes have different feature distributions, so the point-picking strategy differs.
Indoor scenes
- Features are abundant (wall corners, doors and windows, columns, furniture), and common features are generally easy to find.
- For symmetric, repetitive structures (such as identical corridors or rows of workstations), it is not recommended to pick points there unless the order can be distinguished quickly.
Outdoor scenes
- Features are relatively sparse; prefer stable ground features such as building corners, pole-like objects, and steps.
- Avoid using movable or unstable objects such as trees and vehicles as registration features.
Mixed indoor-outdoor scenes
- Use the indoor-outdoor transition area (entrance, porch, connecting corridor) as the key overlap zone.
- Make sure there are enough common features on both sides of the transition zone, to avoid seam misalignment caused by indoor and outdoor being handled separately.
Coordinate handling of registered point clouds
General principle
Registration uses the coordinate system of the reference map chosen by the user; the other maps to be registered are aligned onto the reference map and the reference map's coordinate offset is applied.
Two coordinate cases
- A map without absolute coordinates registered with a map that has absolute coordinates: use the map with absolute coordinates as the reference map; after registration the map without absolute coordinates obtains absolute coordinates.
- Maps in different coordinate systems registered together: choose one of the coordinate systems as the reference; after registration the other maps are unified into that reference coordinate system, bringing multiple maps into one coordinate system.
General registration steps (manual registration)
The point cloud editing tools of Lixel Studio provide manual registration, which is the general method of registration.
Example with different absolute coordinate systems
Import each group of point cloud results to be registered, then:
- Use Lixel Studio (version v4.1.1 or above is required) to process each one individually, to optimize the accuracy of each map and remove noise.
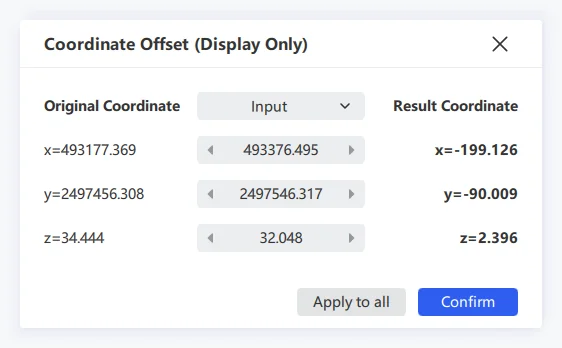
- Point cloud 1104_1 has the coordinate system CGCS2000:
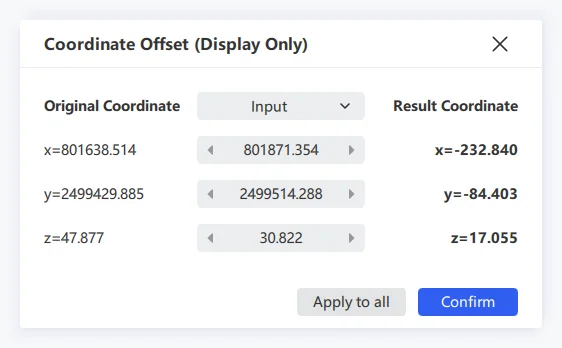
- Point cloud 1104_2 has the coordinate system WGS84. When importing point clouds in different coordinate systems, choose "Input":
- Switch the point cloud rendering mode to "Intensity". If you use "True Color" mode, coloring errors may be introduced; decide as appropriate.
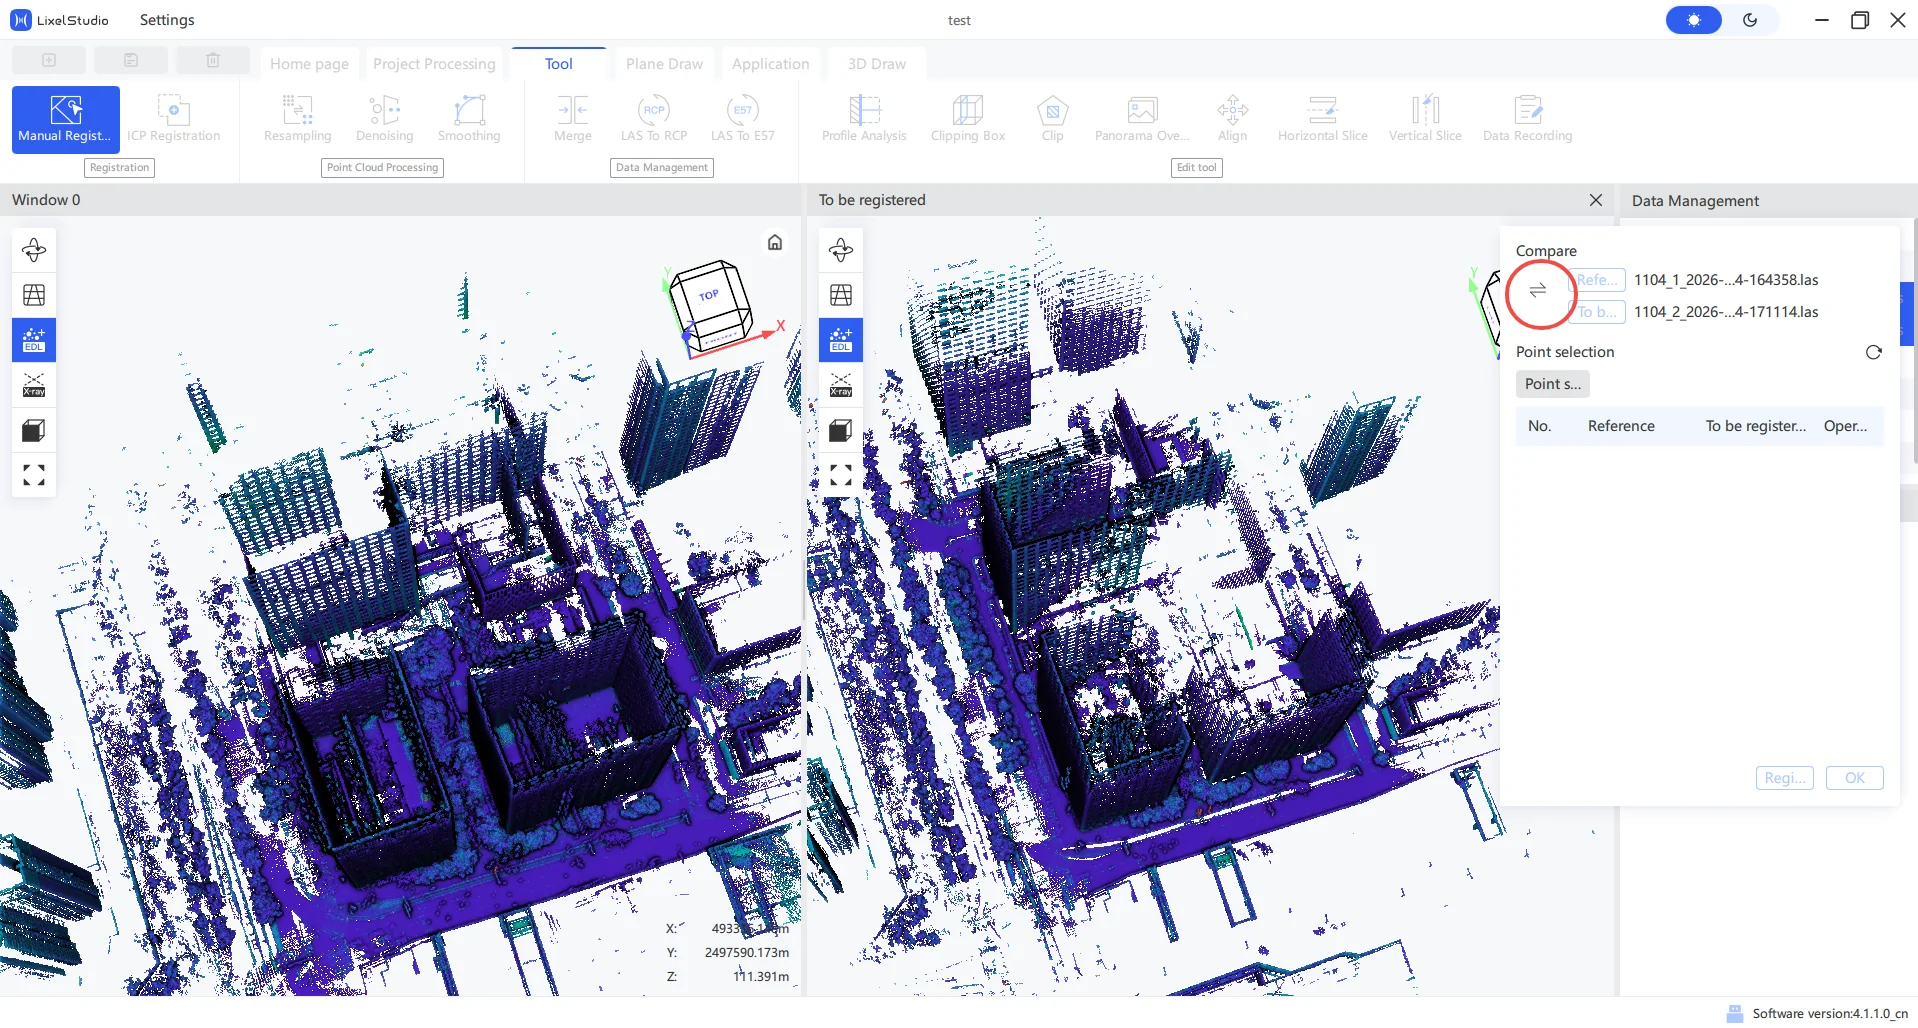
- Select both point clouds, click "Tools" - "Manual Registration", then click the toggle icon to select your base map. The base map's coordinate system is the coordinate system of the registration result, and the left viewport is the base map:
- Browse the point clouds in the left and right viewports, identify the area where trajectories overlap, click "Pick Point", and find the same feature point in the overlapping region. There is a magnifier above the cursor for easier observation. (If the overlapping region has no shared capture trajectory, the registration error will be larger.)
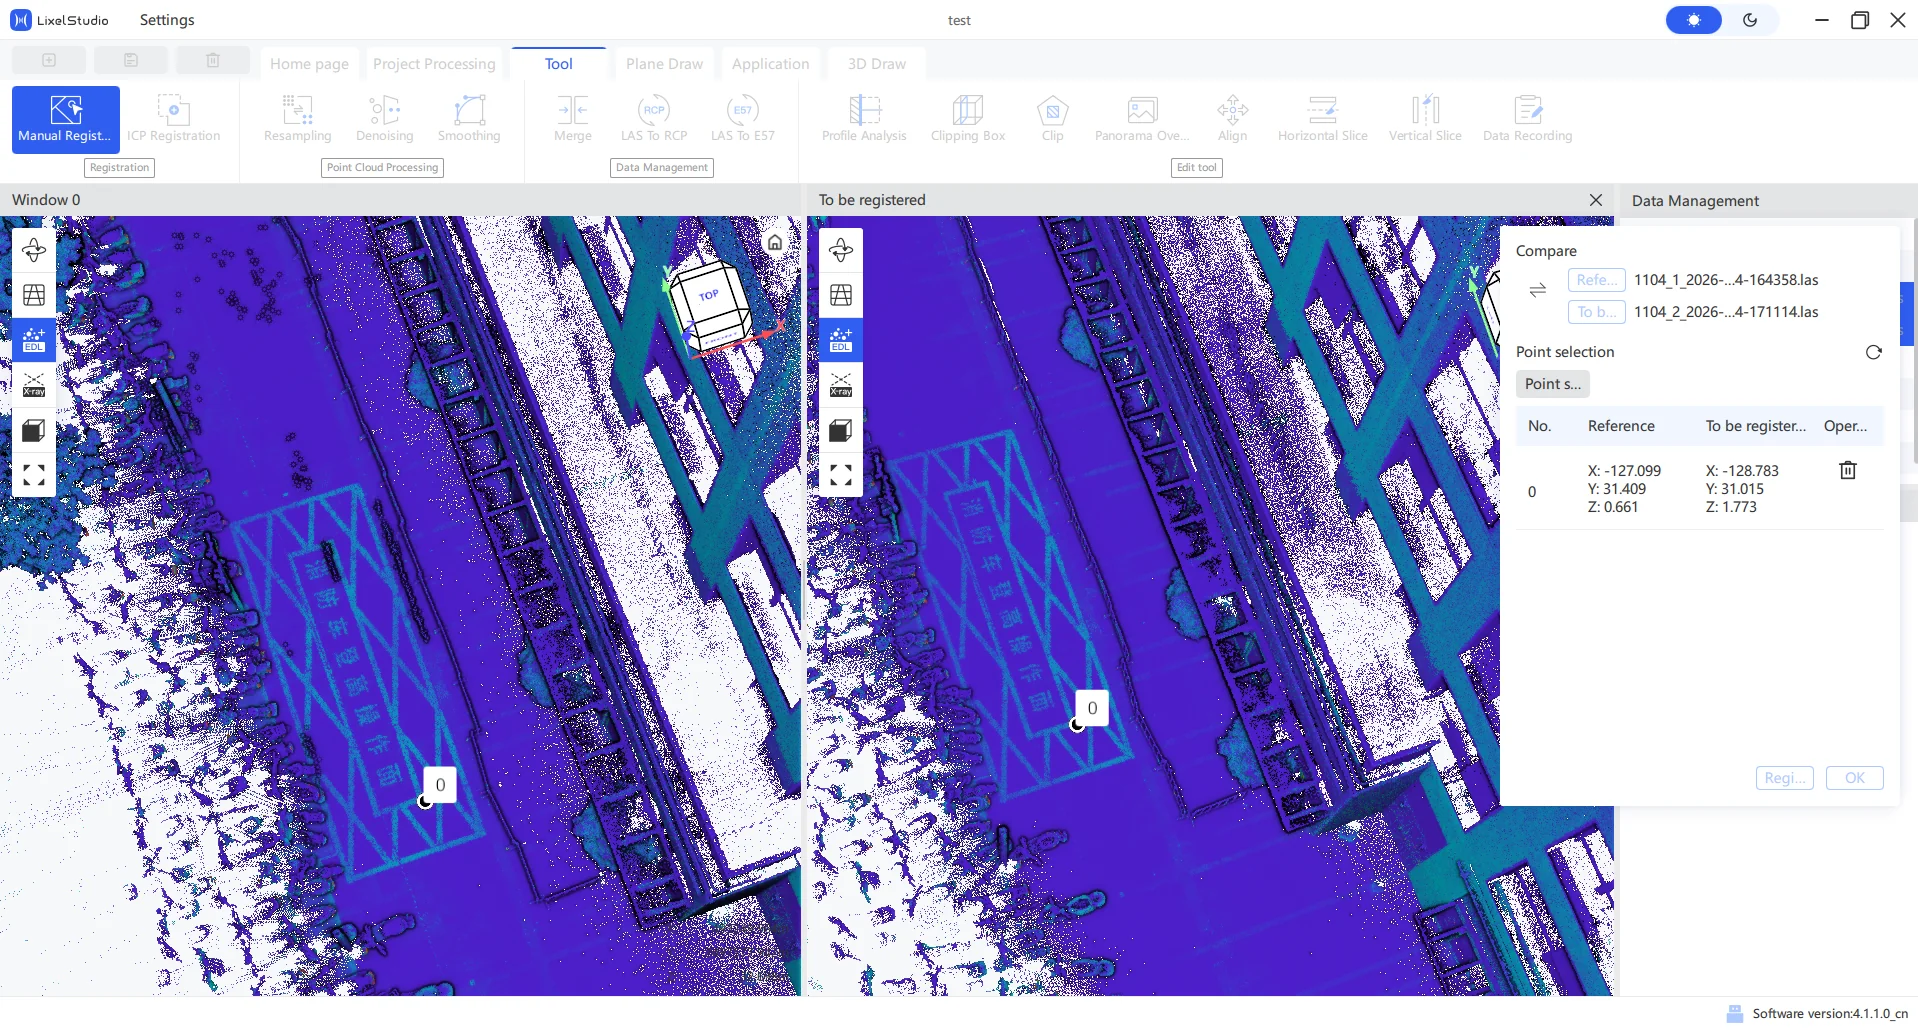
- Keep clicking "Pick Point" to enter the next selection. If you pick the wrong one, click the delete icon on the right to remove that pair. Once multiple point pairs are evenly distributed over the overlapping region, click "Register" to see the RMSE error of all points; the smaller the better. Before confirming you can repeatedly pick and delete points and watch the error value, until it can no longer be reduced, which means the current registration has reached its limit.
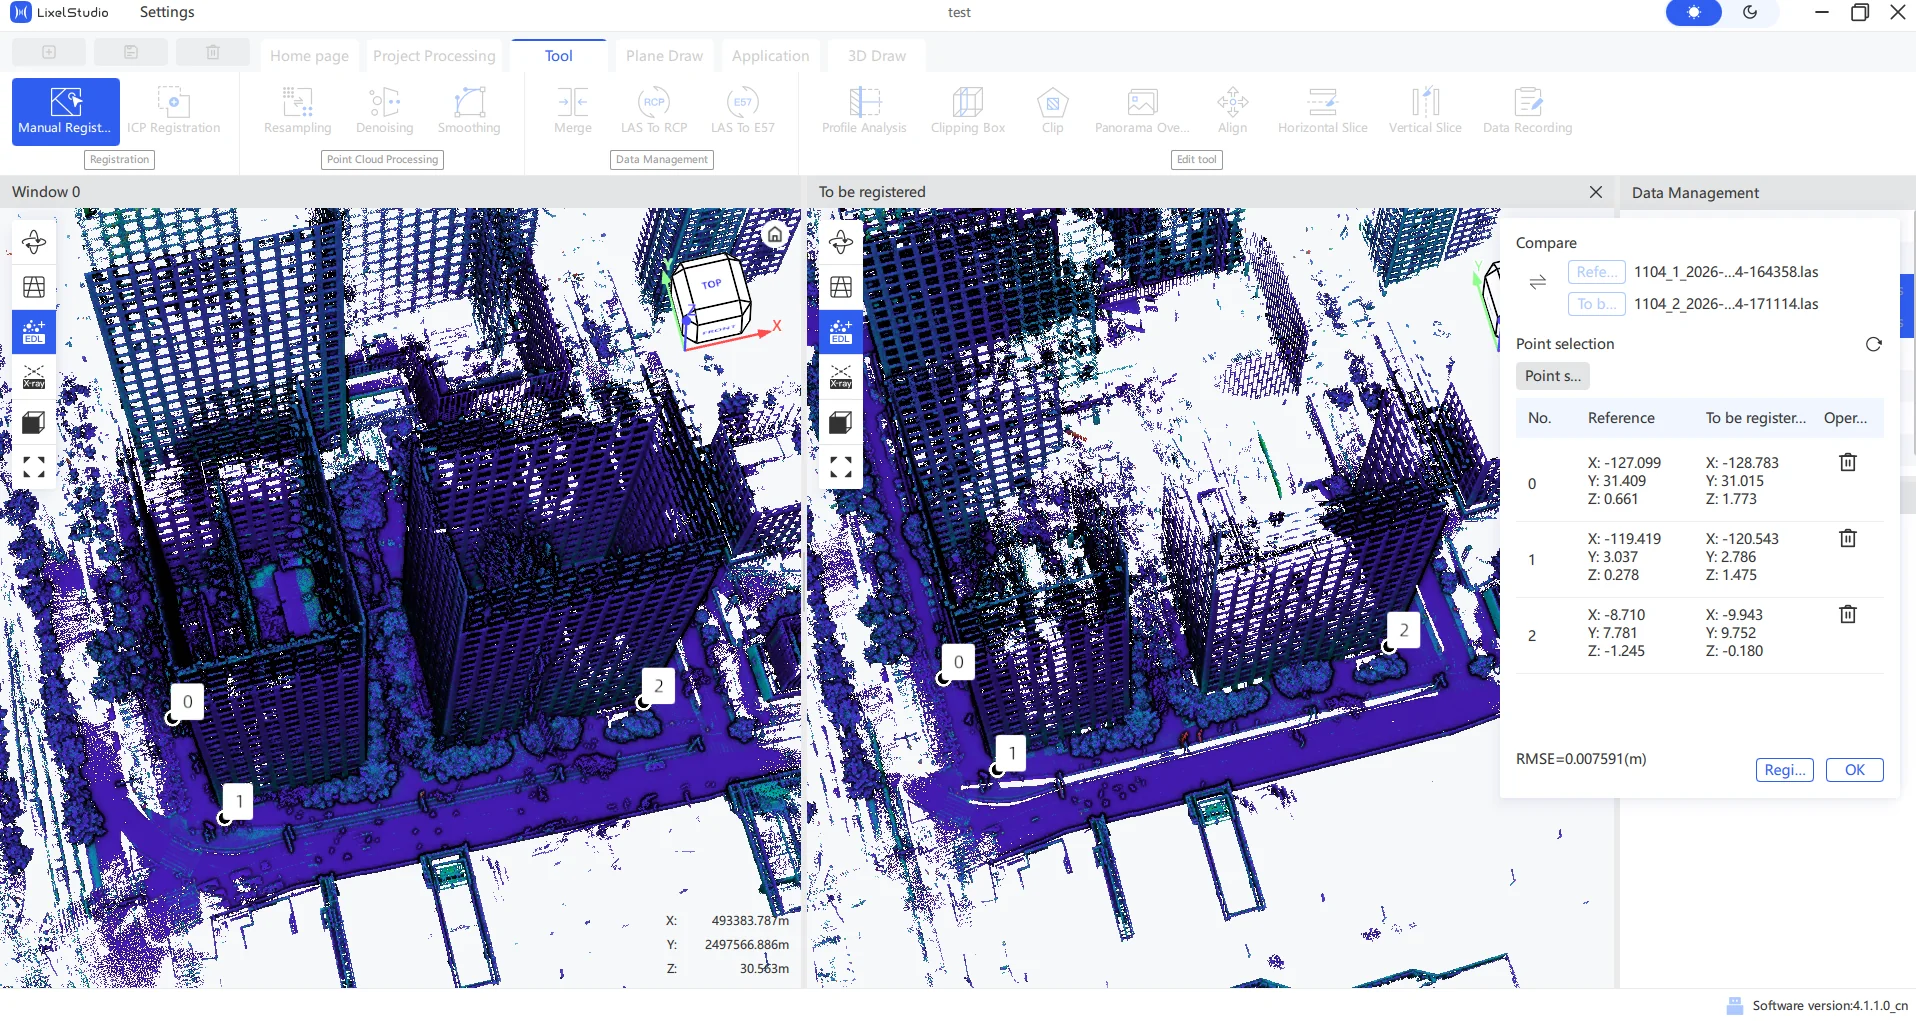
- Click "Confirm" to exit registration. The registered point cloud result is imported automatically; after loading you will see a point cloud whose name starts with manual_aligned_:
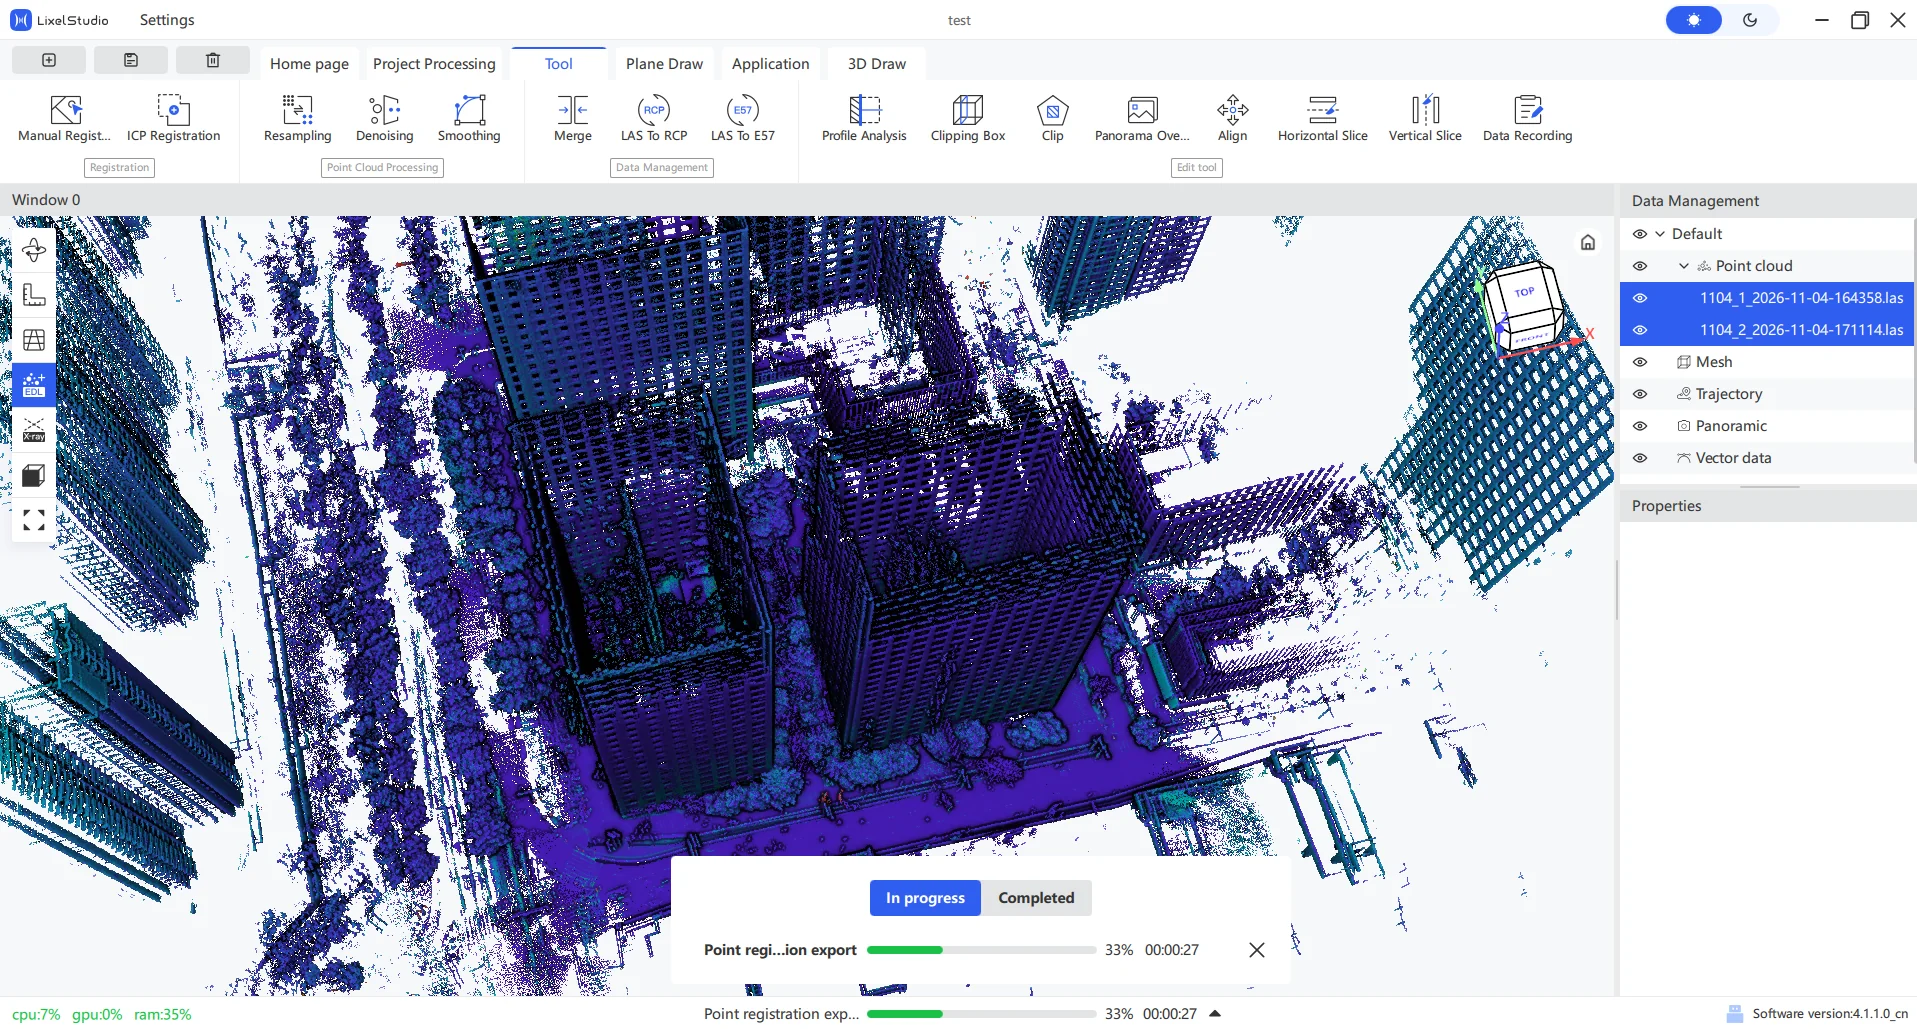
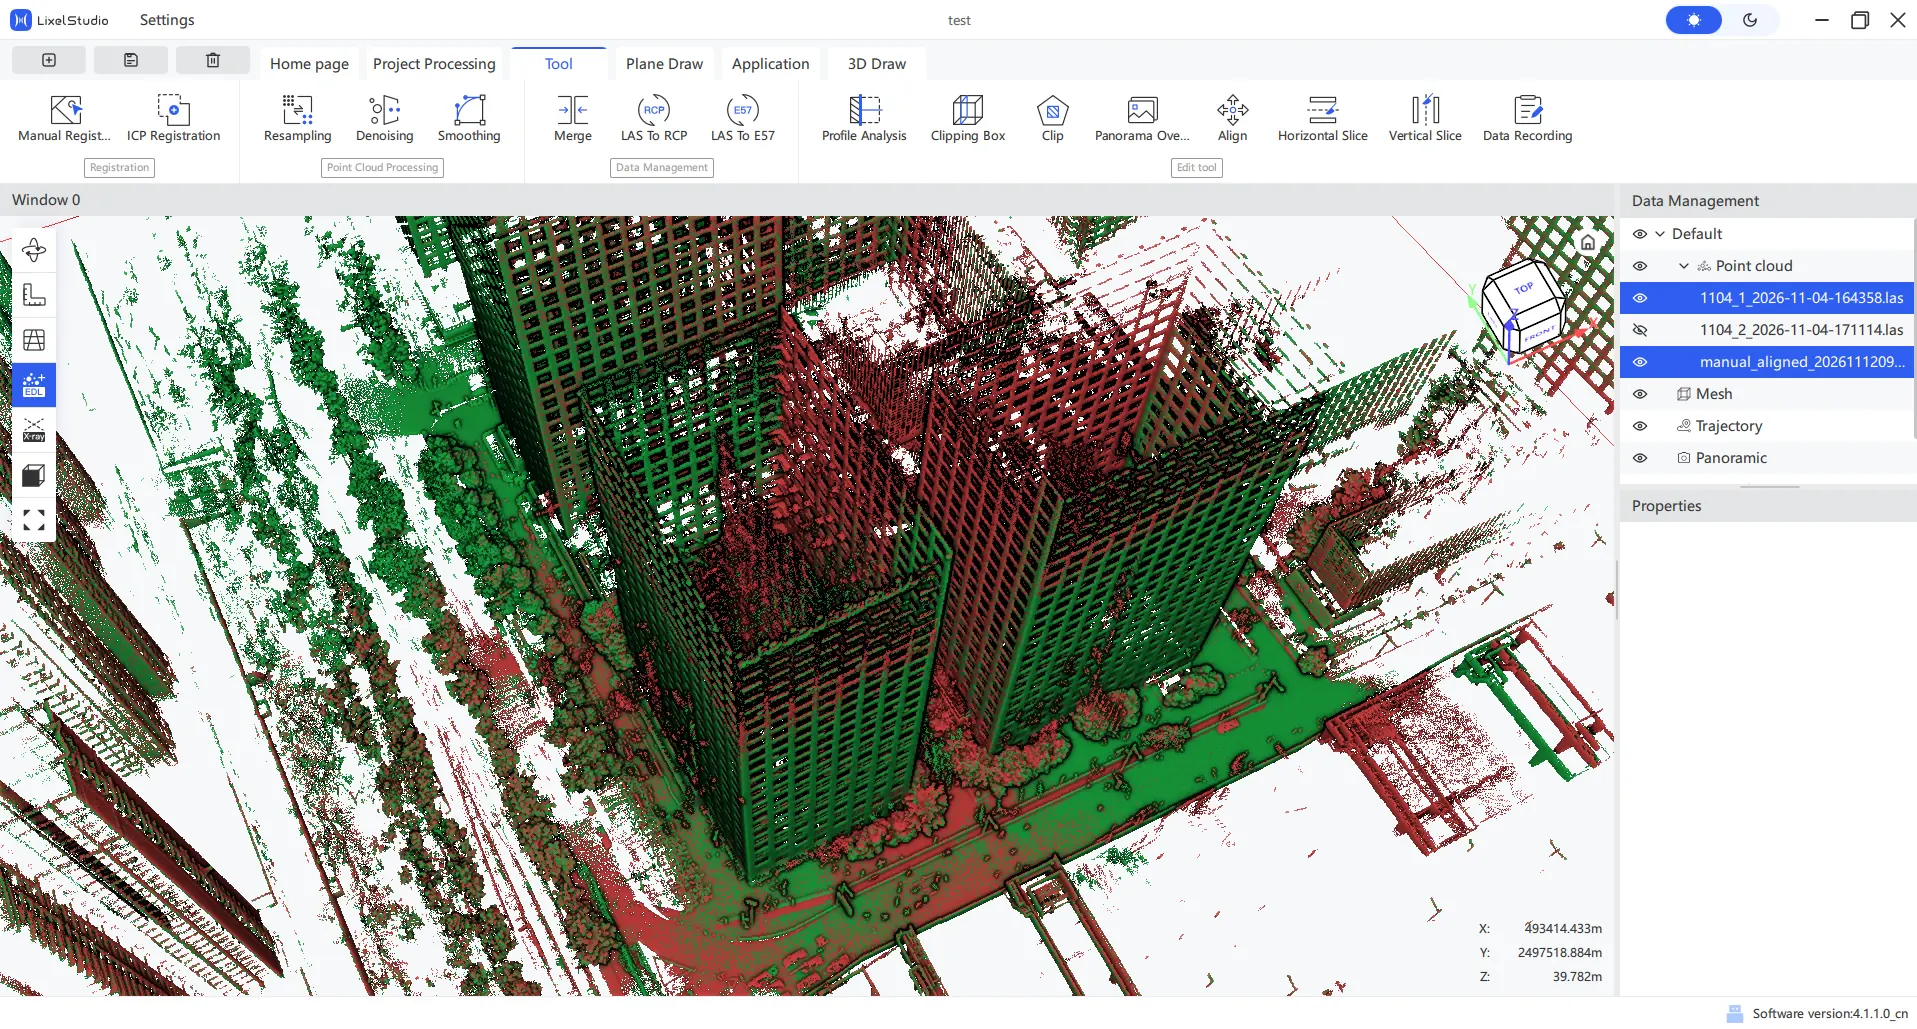
- Render the point clouds in different colors and observe the overlap between 1104_1 and the manual_aligned point cloud. Using the point measurement tool you can see that the coordinate system is already consistent with the base map. Select both point clouds, merge and export:
Indoor example without a coordinate system
Handle indoor corridor/passage scenes with low overlap between upper and lower floors in the same way. Because the structures are similar it is easy to pick the wrong position. Below is a registration example of adjacent floors 22F and 23F.
- Both imported maps have no absolute coordinates and an offset of 0, so just confirm directly. With no coordinates to compare, which one is the base map is up to the user. First find the overlapping region:
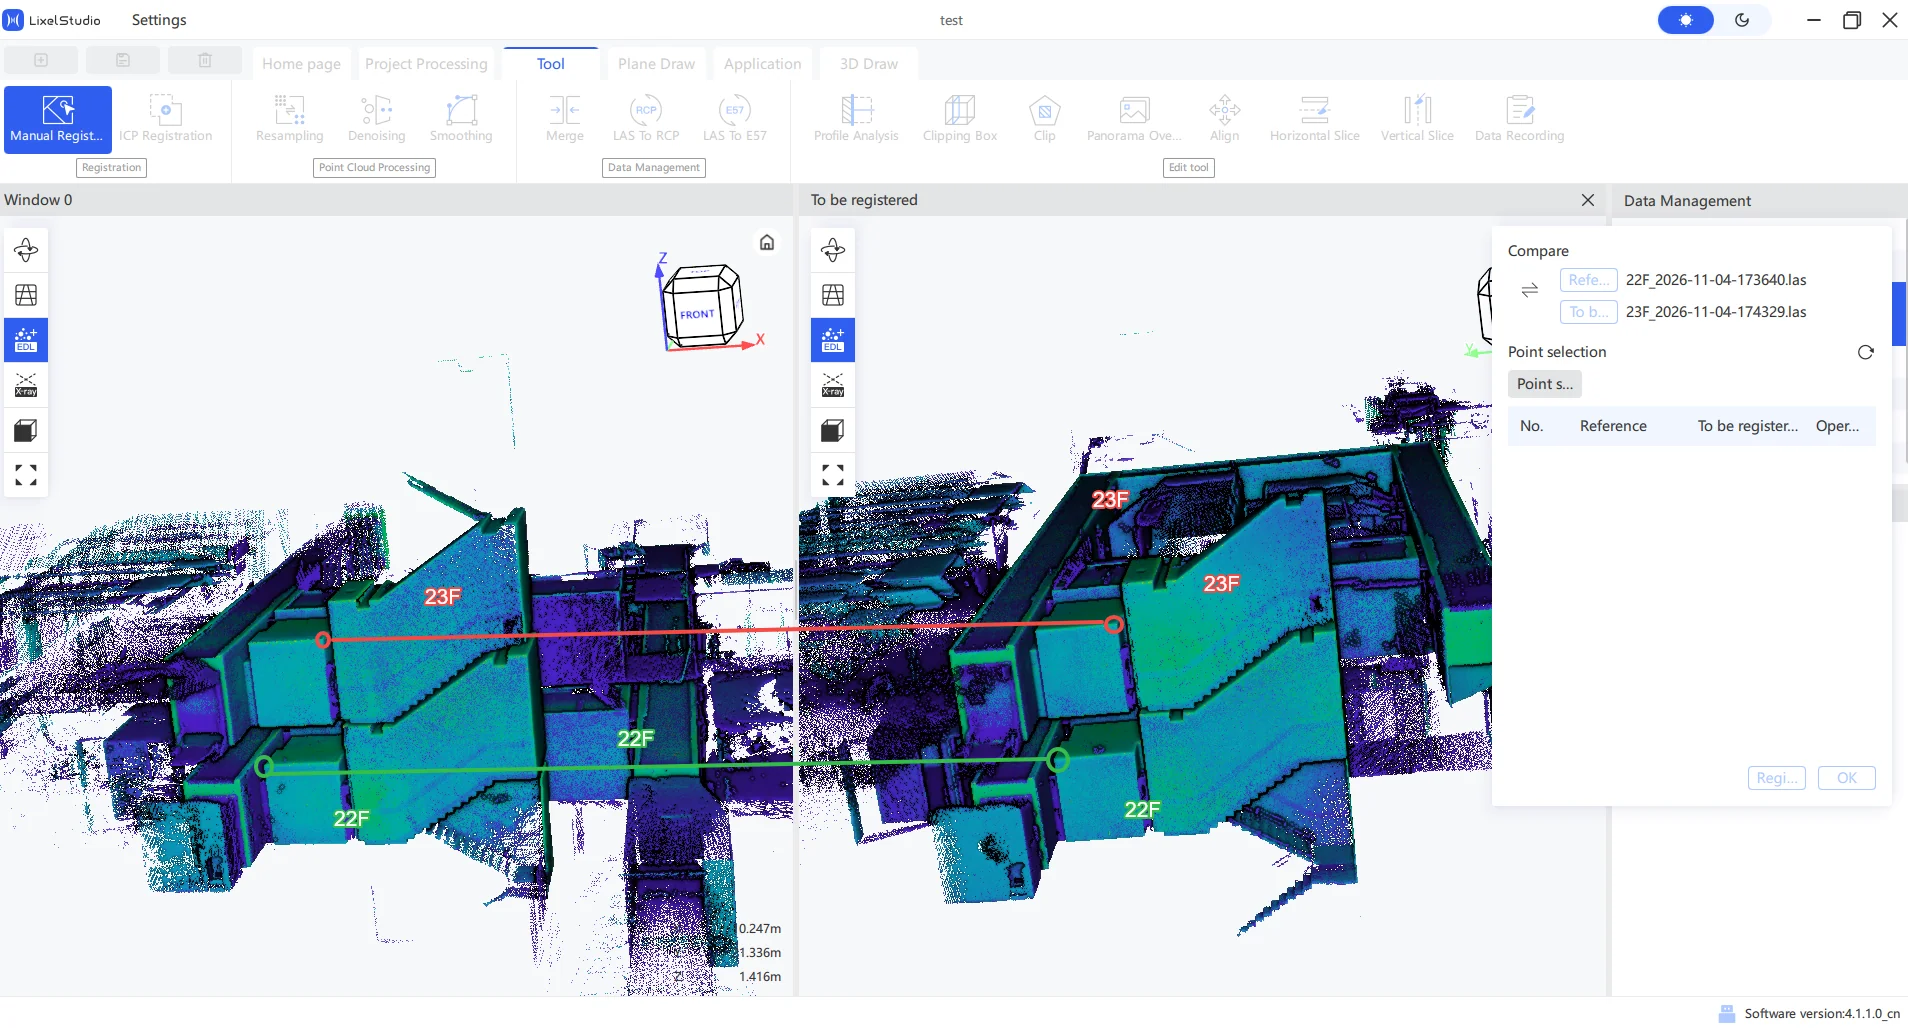
- Double-click the point-picking position, zoom in nearby, hold the left mouse button and move to observe, avoiding picking the wrong point because other point clouds block the front:
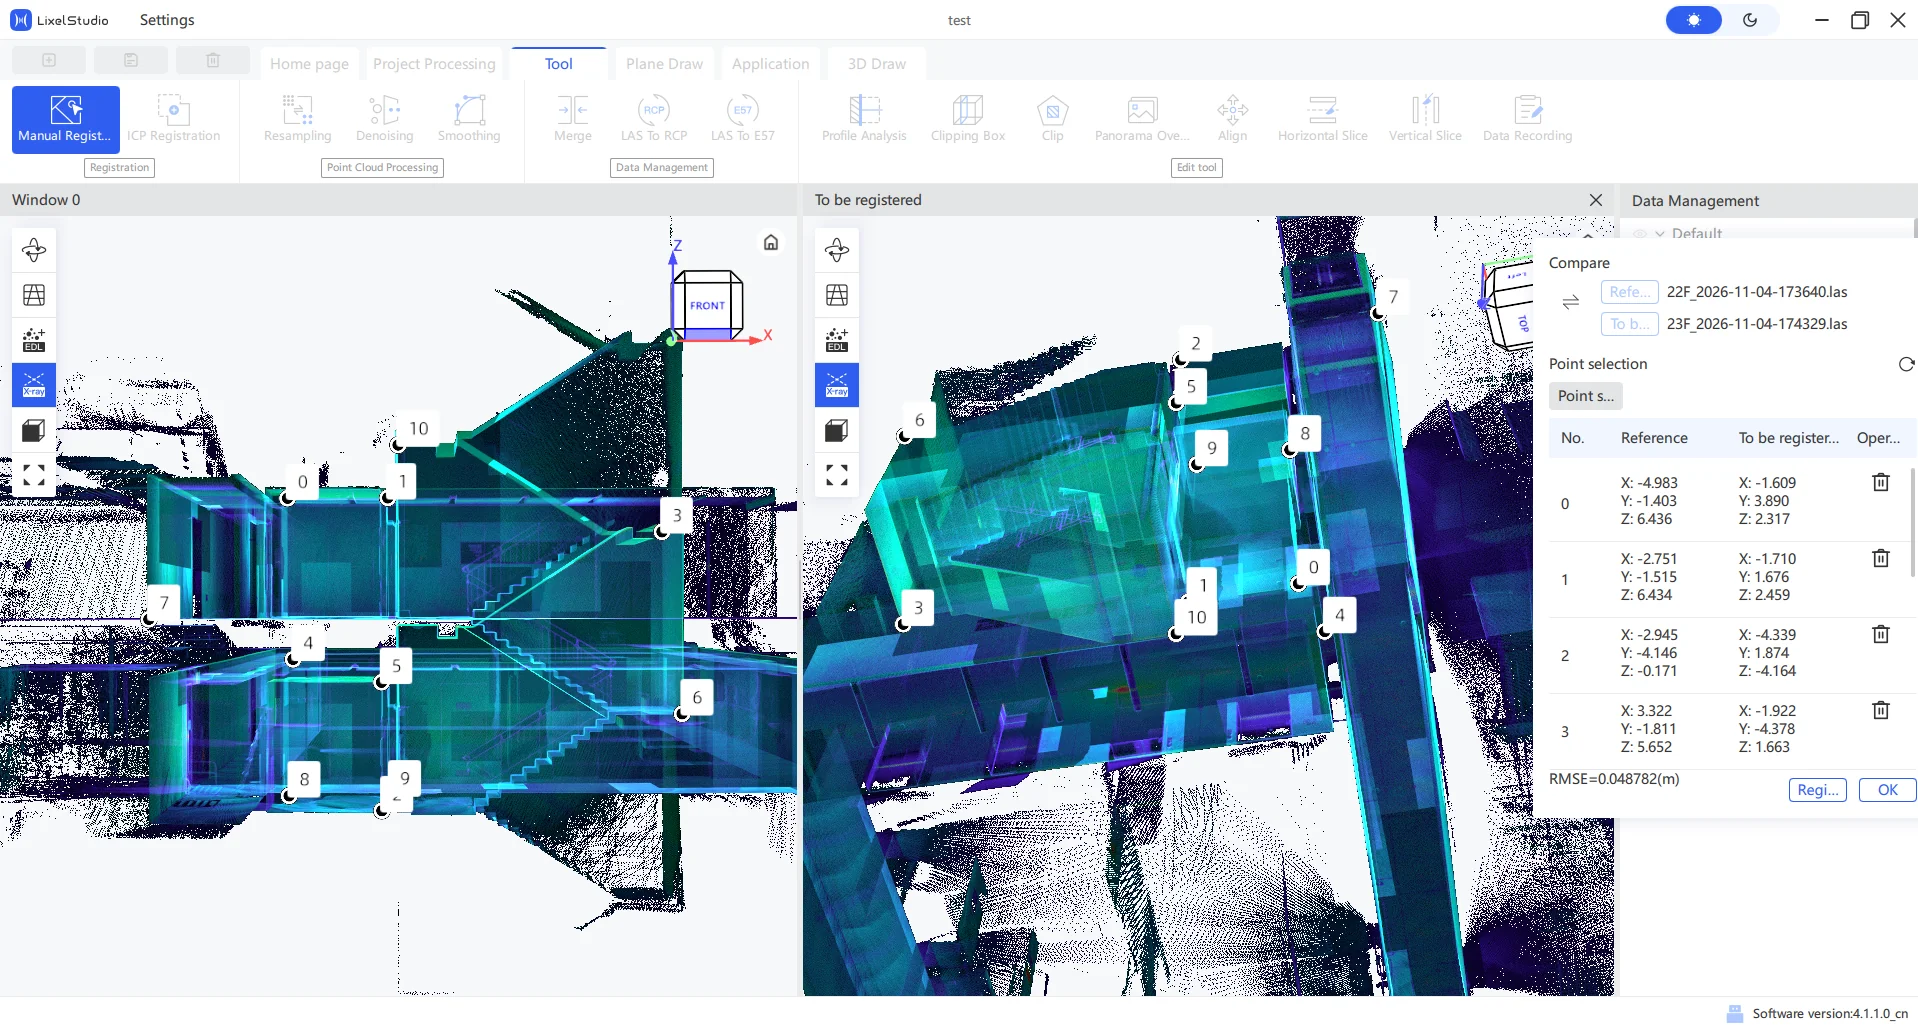
- Arrange points evenly across space; indoors you can choose points such as the ceiling and stair corners:
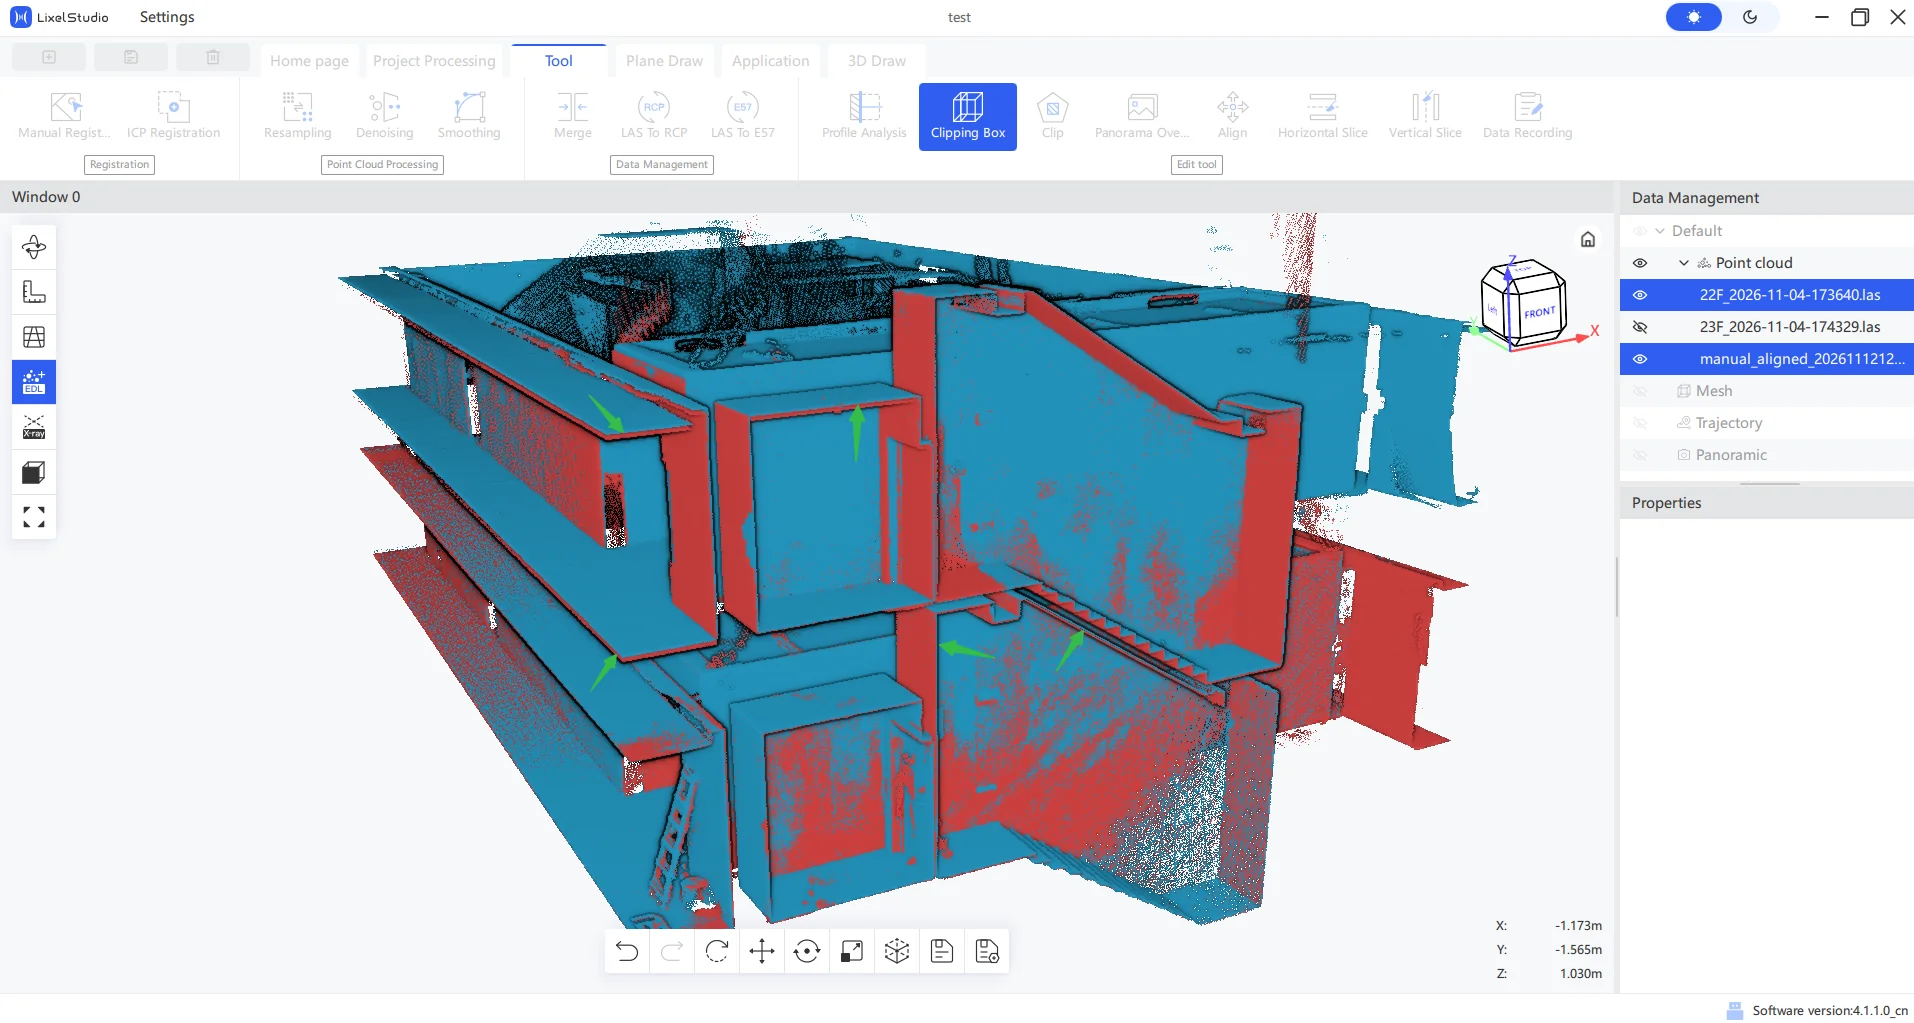
- Click "Register" - "Confirm", and after the point cloud is loaded automatically, render it in a single color and use the 3D crop box to cut inside and observe the floor and ceiling. You will find the registration is mediocre and the positions at the arrows do not overlap ideally. However this is already as expected for point cloud registration, and further attempts cannot improve it. If the user cannot accept the current result, they can try third-party software for registration, or simply recapture according to the fusion rules:
Optional: ICP registration
Lixel Studio also provides ICP registration as an optional method besides manual registration, to be used as needed.
Usage limitation (important): ICP registration requires the two point clouds to have as much as 70% overlap to achieve an obvious effect. Ordinary field capture rarely reaches such high overlap, so ICP registration is not a generally recommended step and is only used as a supplement when the overlap is truly sufficient.
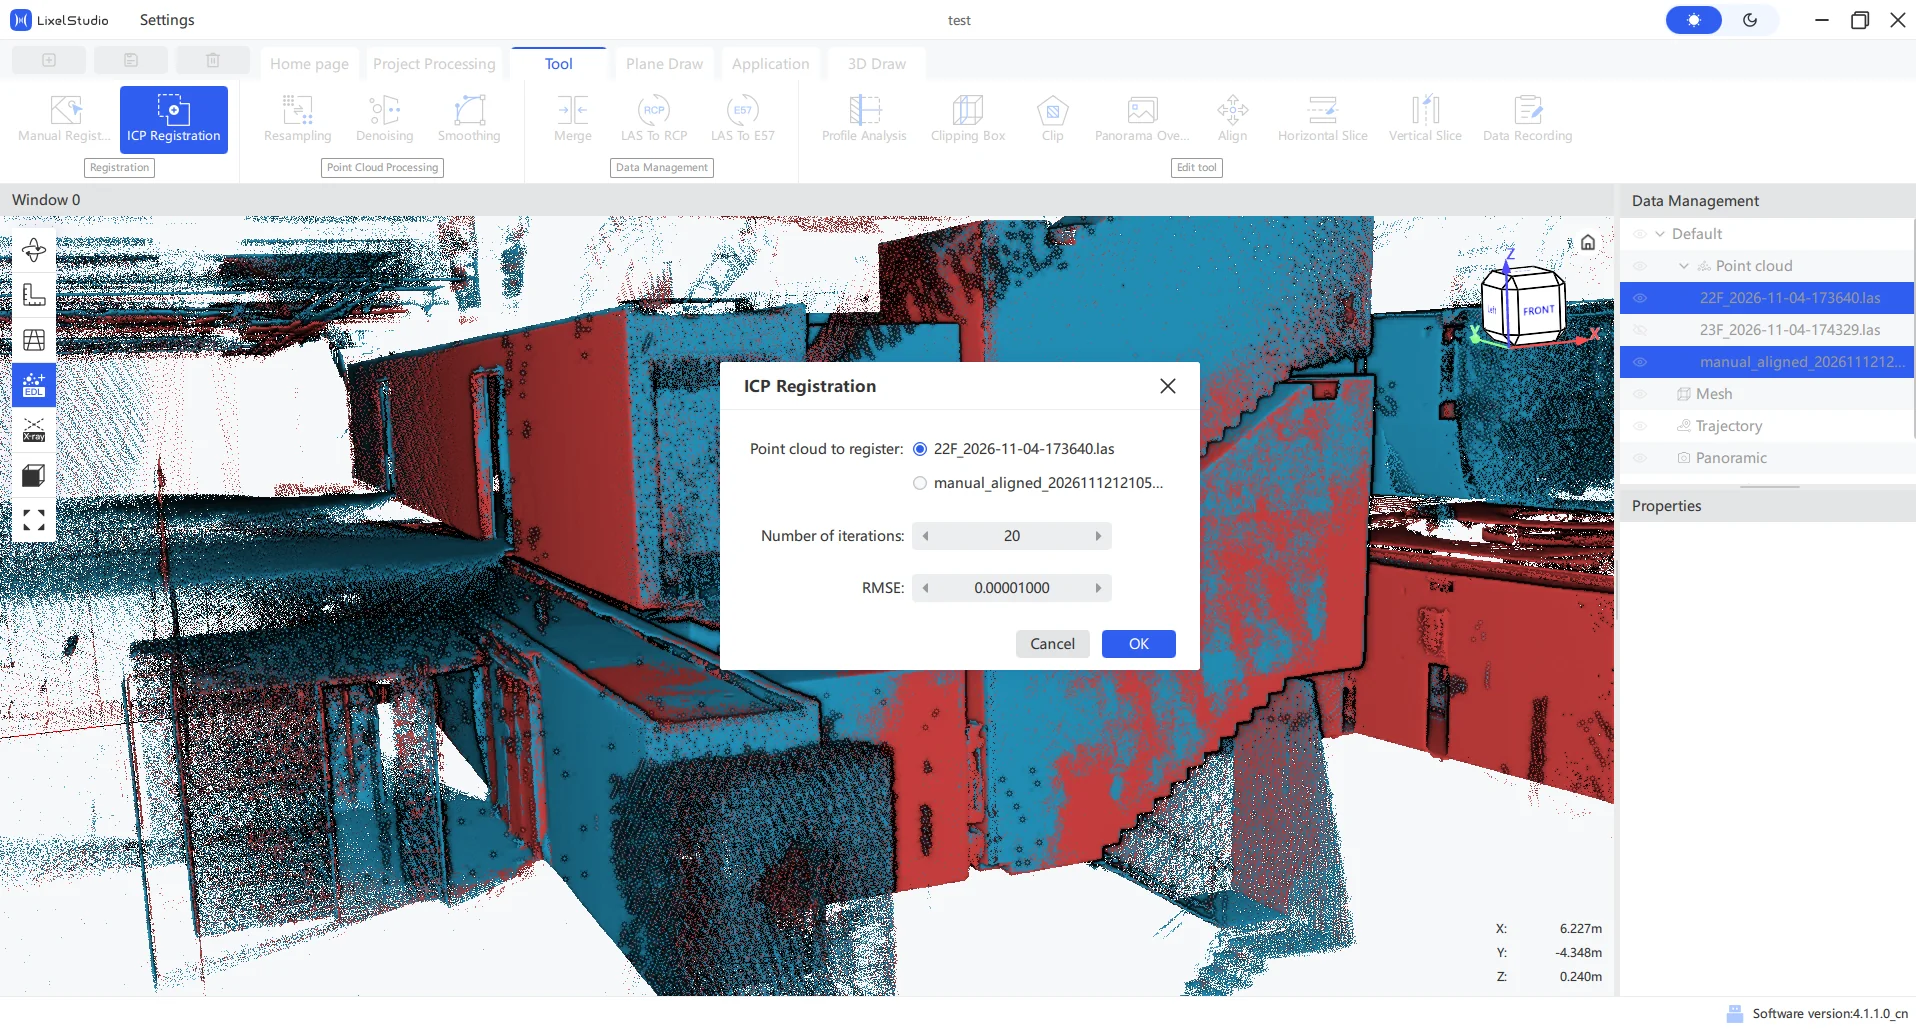
How to use: first achieve a coarse registration with the regular manual-registration procedure, then select the coarse-registration result map and the base map, and click "ICP Registration". A dialog will appear to confirm the point clouds to be registered.
The example below only demonstrates the method. Because 22F and 23F do not overlap enough, the ICP registration does not improve and may even be worse. You can also consider trying third-party software for ICP:
Quality check and common issues
Expected result and registration accuracy
Registration accuracy is referenced by the registration report value actually produced by manual processing. In theory, the smaller the value, the better the overlap at the overlapping positions.
Note that registration is a rigid transformation and cannot make the overlapping area seamlessly stitched the way fitting the same feature would, so the registration error cannot be eliminated completely and can only be reduced as much as possible. Ways to reduce the error:
- Use as many registration points as possible;
- After adjustment, remove registration points with large errors from the report and reselect them at other positions.
If after multiple attempts the error stays at a similar level, it means the registration accuracy of this group of maps has reached its lowest achievable level, and there is no need to keep adjusting.
Checking the registration result
After registration, focus on the following:
- Layering: whether the same plane is split into upper and lower layers.
- Misalignment: whether the same structure in the overlapping region is aligned and whether the seams fit.
- Overall consistency: whether the stitched whole is distorted or offset.
Common issues and troubleshooting
| Symptom | Possible cause | Suggested handling |
|---|---|---|
| Registration fails or is obviously misaligned | Insufficient overlap, features too weak | Choose an overlap region with richer features, or add tie feature points |
| Layering at the seam | Poor edge accuracy, inaccurate tie points | Reselect more stable common features, avoid weak-texture areas |
| Coordinate result does not meet expectations | Wrong reference map chosen, coordinate offset not applied correctly | Check the reference map and coordinate system settings |
| ICP registration has no effect | Overlap less than 70% | Use manual registration, or use ICP only when overlap is sufficient |
Best practices (preventive advice)
- During capture, reserve sufficient overlap between adjacent data as much as possible, to leave room for later registration.
- Use Map Fusion when possible; use registration as a means when fusion is unavailable or for splitting large scenes.
- Be clear about the capability boundary between registration and fusion: fusion relies on standard capture, registration relies on overlapping features.
- In weak-feature or repetitive-feature scenes, get into the habit of placing target papers to help later identify reflection intensity and pick points.