
Indoor Scene Capture
Applicable devices: Lixel P1, Lixel L2 Pro, Lixel K2
In indoor 3DGS reconstruction, professional-grade hardware matters, but capture strategy matters more. Walking and shooting without a plan easily leads to missing ceilings, floating artifacts, weak-texture region failures, and distorted geometry. By following the staged workflow in this chapter, even an ordinary phone or action camera can produce a structurally complete, clean reconstruction.
Core Approach
- Maximize viewpoint coverage of the scene
- Maintain stable overlap between frames (60%–80%)
- Specifically capture the ceiling and floor
- Avoid ineffective viewpoints such as pure rotation
Preparation
Site Preparation
Before formal capture, open all indoor doors and passages in advance so that you can move continuously during capture without interrupting the route.
Lighting Preparation
For indoor capture, lighting is critical. When ambient brightness is insufficient, the camera automatically extends the shutter time, causing motion blur, increased image noise, and abnormal feature matching.
- Turn on all fixed lights
- Avoid using flash (flash causes inconsistent lighting between frames)
- Keep curtains in a fixed state (do not open/close them mid-capture)
Scene Cleanup
- Remove or fix all potentially moving objects (people, pets, curtains in the wind)
- Turn off electric fans and secure lightweight items near AC vents
- Ensure the floor is clean with no large reflective puddles
- Glass/mirror areas: avoid or cover them when possible
Staged Capture Workflow (Three-Pass Method)
Indoor capture is recommended to be completed in three stages, each addressing a different coverage need:
Pass 1: Wall Perimeter Loop
Walk slowly along the room walls, keeping the lens always pointed toward the opposite side of the room (toward the far wall).
Purpose: Records the overall room structure and geometric relationships, forming stable side-view frame overlap and avoiding abrupt viewpoint changes.
Key points:
- Keep 0.5–1 m from the wall
- Slow your walking speed (0.3–0.5 m/s)
- Move the camera smoothly, avoiding shake
- For multi-room spaces: walk a full loop along the walls of each room, and pause longer near doorways
Completing just this step already yields a solid, reasonably stable reconstruction model.
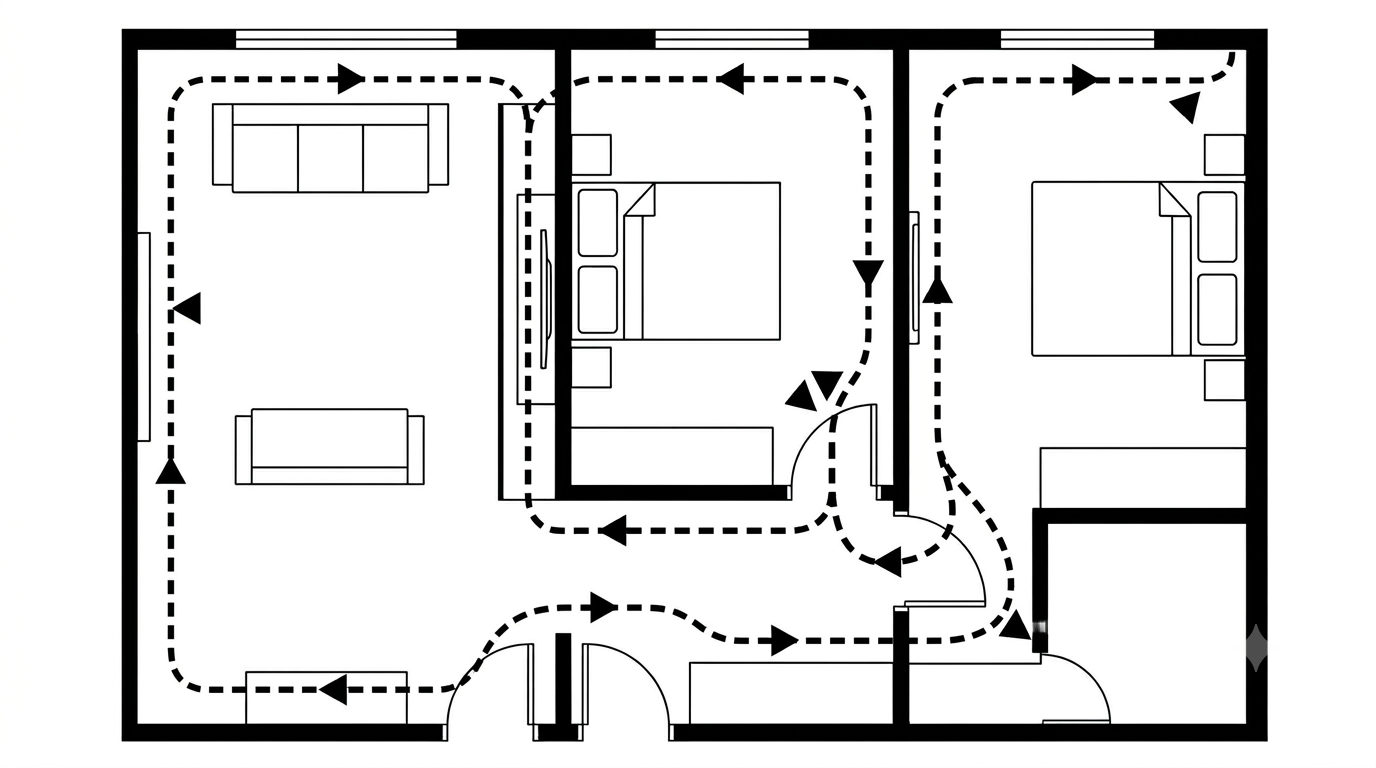
Pass 1: Wall perimeter loop path (top-down view)
Pass 2: Grid Traversal
Enter the central area of the room and traverse along a grid (#-shaped) route.
Purpose: Captures objects in the middle of the room and spatial depth relationships, forming multi-view cross constraints to further optimize geometric consistency.
Key points:
- Walk 2–3 lines horizontally and 2–3 lines vertically to form a grid
- Keep the lens at eye level, facing the direction of travel
- Especially suitable for open spaces such as living rooms, offices, and showrooms
- For weak-texture areas (white walls, open areas), grid traversal effectively adds multi-angle constraints
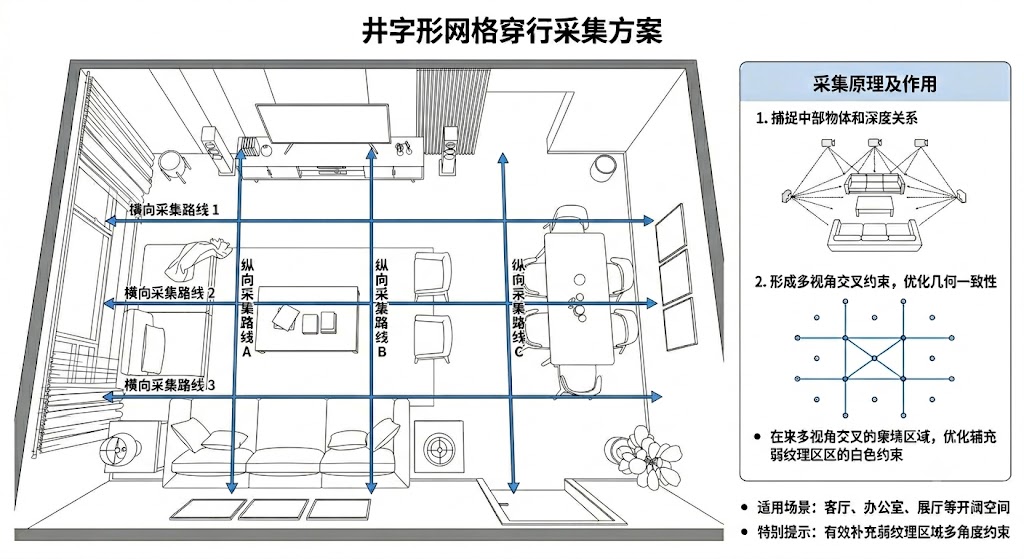
Pass 2: Grid traversal route
Pass 3: Ceiling and Floor Focus
This step is easily overlooked but noticeably improves results.
Keeping the same walking routes as the first two passes, walk through again with the lens pointed up (at the ceiling) and down (at the floor) respectively.
Purpose: Restores ceiling shapes, floor details, and lighting structures, ensuring continuous corner and edge lines.
Key points:
- Upward shooting: covers the ceiling, light fixtures, and AC vents
- Downward shooting: covers floor materials, baseboards, and the bottom of furniture
- You can also switch between forward → up → down views every few steps along the same route
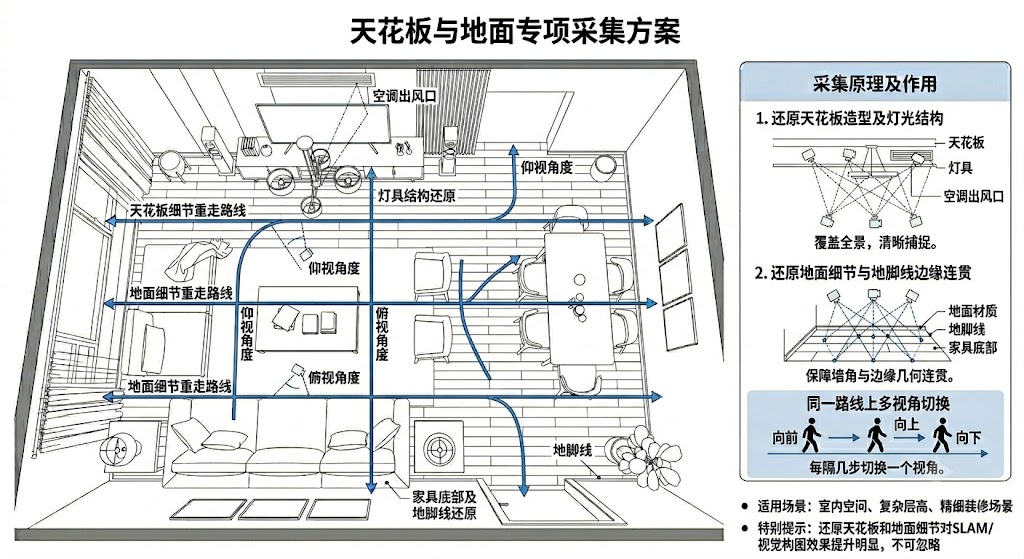
Pass 3: Ceiling and floor shooting angles
Lixel P1 Specific Recommendations
| Item | Recommendation |
|---|---|
| Holding method | Hold with both hands, keep level |
| Walking speed | 0.3–0.5 m/s (slower than L2 Pro) |
| Turning | Turn slowly, avoid sharp turns |
| Door frames / passages | Pause 2–3 seconds at door frames to ensure full coverage of transition areas |
| Layered optimization | On by default; if the scene has lots of repeating textures (cubicles), it is recommended to turn it off |
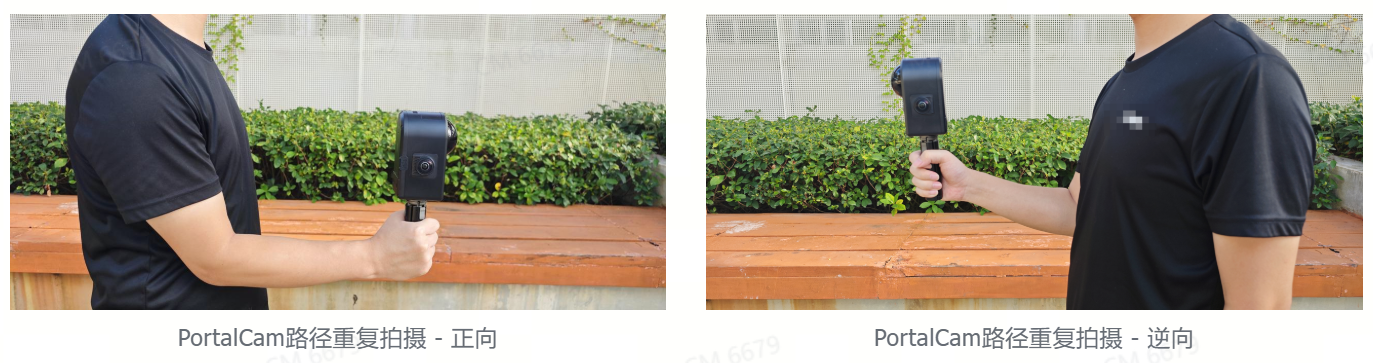
Lixel P1 correct holding posture
Lixel L2 Pro / K2 Specific Recommendations
| Item | Recommendation |
|---|---|
| Holding method | One or two hands, keep the device upright |
| Walking speed | 0.5–1.0 m/s |
| Scan angle | Tilt the device slightly forward 15° to cover the ground |
| Loop path | Form a closed loop when possible (start = end) to improve loop detection accuracy |
| Lens orientation | Open scenes: lenses face left and right along the direction of travel |
| Corridors / narrow spaces | Capture sideways, ensuring one lens faces the direction of travel |
Corridors and doorways: When capturing corridors, narrow spaces, or entering/exiting doorways, walk sideways to ensure one lens always faces the direction of travel. This avoids reconstruction failure caused by occlusion in narrow spaces.
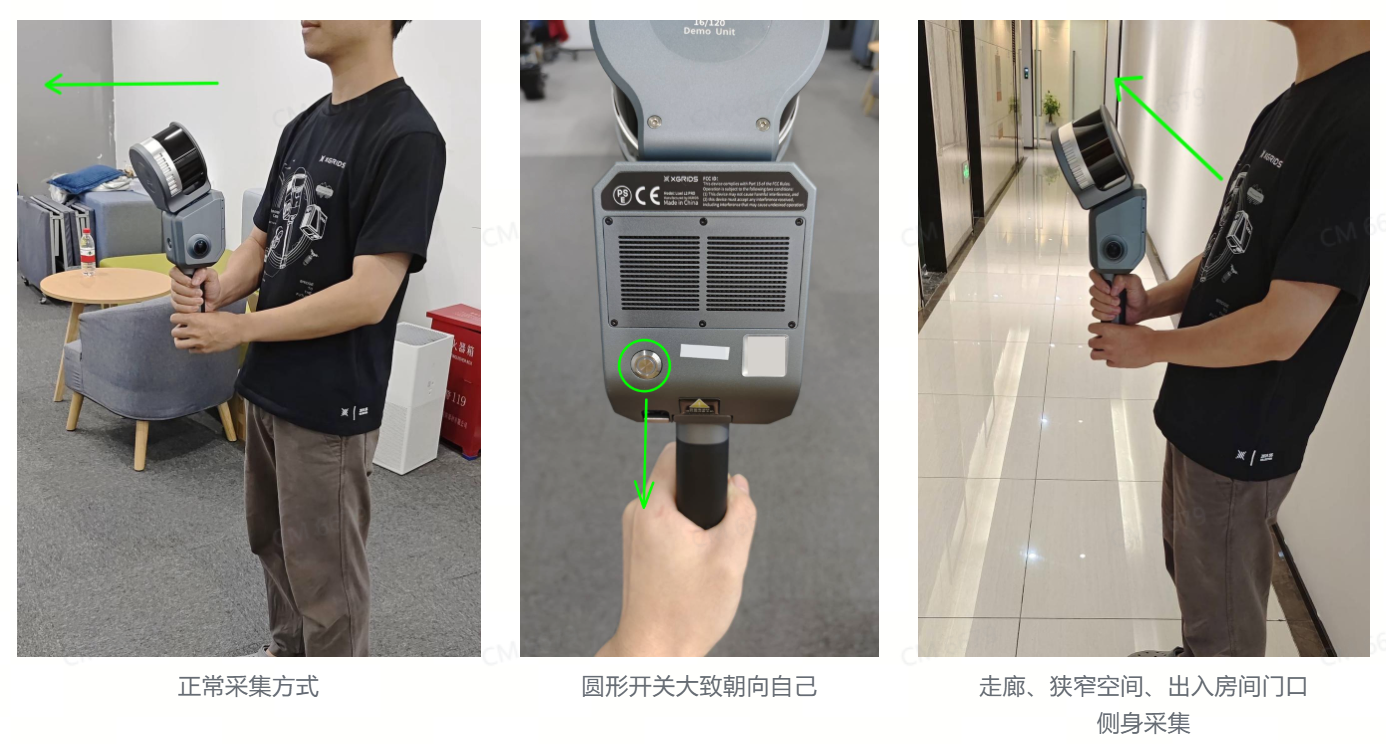
L2 Pro correct holding and scan angle (15° forward tilt), sideways capture posture for corridors/narrow spaces
Capture Checklist
- [ ] All lights on, lighting even
- [ ] Moving objects removed (people have left)
- [ ] All doors open, routes clear
- [ ] Doors and windows fixed (do not open/close mid-capture)
- [ ] Mirrors/glass covered or marked
- [ ] Pass 1: Wall perimeter loop covers all walls ✓
- [ ] Pass 2: Grid traversal covers the central area ✓
- [ ] Pass 3: Ceiling and floor focus coverage ✓
- [ ] Door frames/passages have sufficient transition
Spatial Recognition Specific Requirements
If you need to use LCC Studio's "spatial recognition" feature (automatic floor plan generation + AI instantiation), in addition to completing the indoor capture workflow above, the following extra requirements must be met.
Applicable Scenarios
- Single-story indoor scenes with mostly regular rectangles
- Standard layouts such as apartments, offices, and residences
Personnel Requirements
- Single-person operation is recommended
- Avoid having multiple people in the lenses on either side of the device
- Minimize the proportion of human figures in the lenses, letting the lenses capture richer viewpoints of the indoor scene to improve AI segmentation accuracy
Capture Speed
- Indoor scanning speed not exceeding 0.5 m/s (slower than regular indoor capture)
- Purpose: obtain a denser, more complete indoor point cloud
Door States and Capture
| Door Type | State Requirement | Capture Requirement |
|---|---|---|
| Entrance door | Keep closed | Scan it completely once separately at 0.5-1 m away, capturing the full detail of the entrance door from multiple angles |
| Other interior doors | Keep half-open | Move slowly and steadily when passing through, pausing to scan 5 seconds before and after the door to capture door frame and leaf information |
Key Component Capture
Ensure sufficient point cloud density for key indoor components (doors, windows, beams, columns, pipes, balconies, etc.):
- When capturing such components, tilt the device LiDAR head slightly forward, facing the target object
- Move in a multi-angle S-shape around the target object
- Let the lenses on both sides of the device obtain multi-view object information
Spatial Recognition Checklist
- [ ] Scene is a single-story regular interior (apartment/office/residence)
- [ ] Single-person operation, no extra human figures in frame
- [ ] Capture speed ≤ 0.5 m/s
- [ ] Entrance door closed and scanned separately once
- [ ] Interior doors half-open, pause 5 seconds before and after each door
- [ ] Key components (doors, windows, beams, columns, pipes, balconies) covered with multi-angle S-shape