
Basic Operation
This chapter covers battery installation, base mounting, charging, button operations, indicator light meanings, data transfer, and everyday usage specifications for the Lixel K2.
Battery Installation
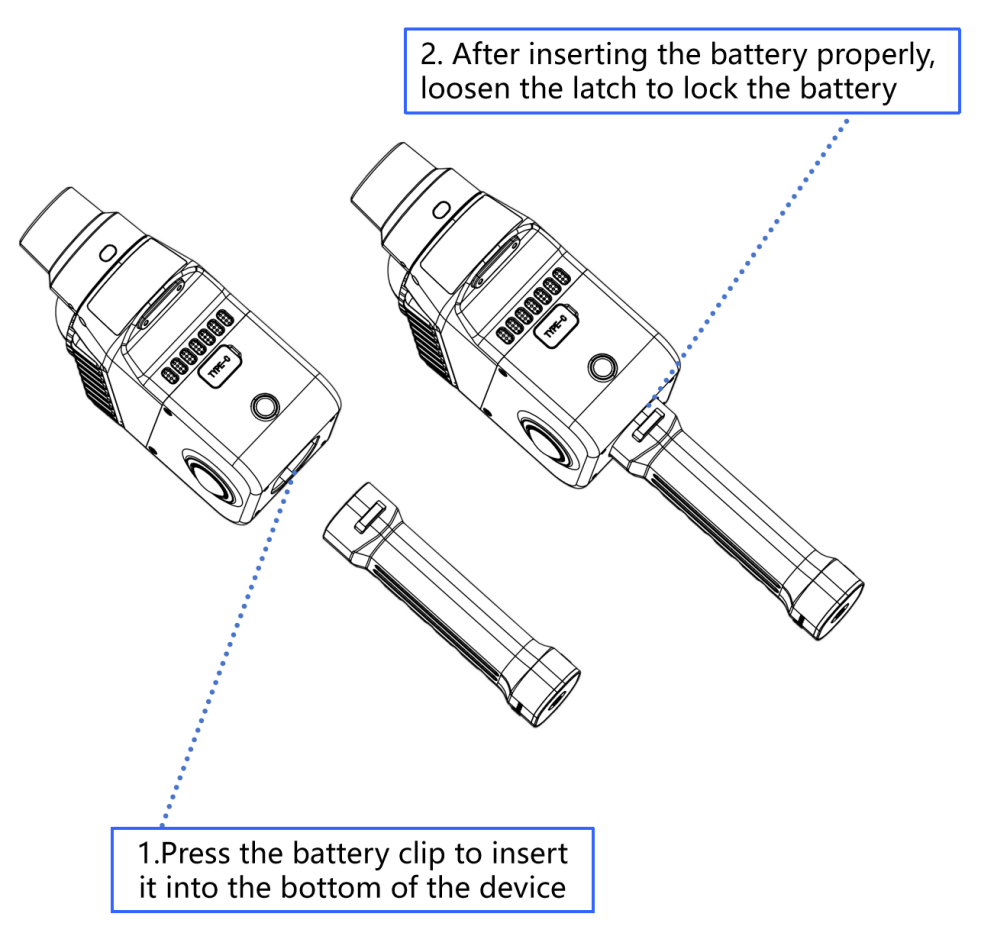
- Press the battery buckle.
- Insert the battery into the bottom of the device and make sure it is fully seated.
- Release the buckle and confirm that the battery is locked.
Note
Failure to lock the battery may cause the device to slip.
Base Mounting
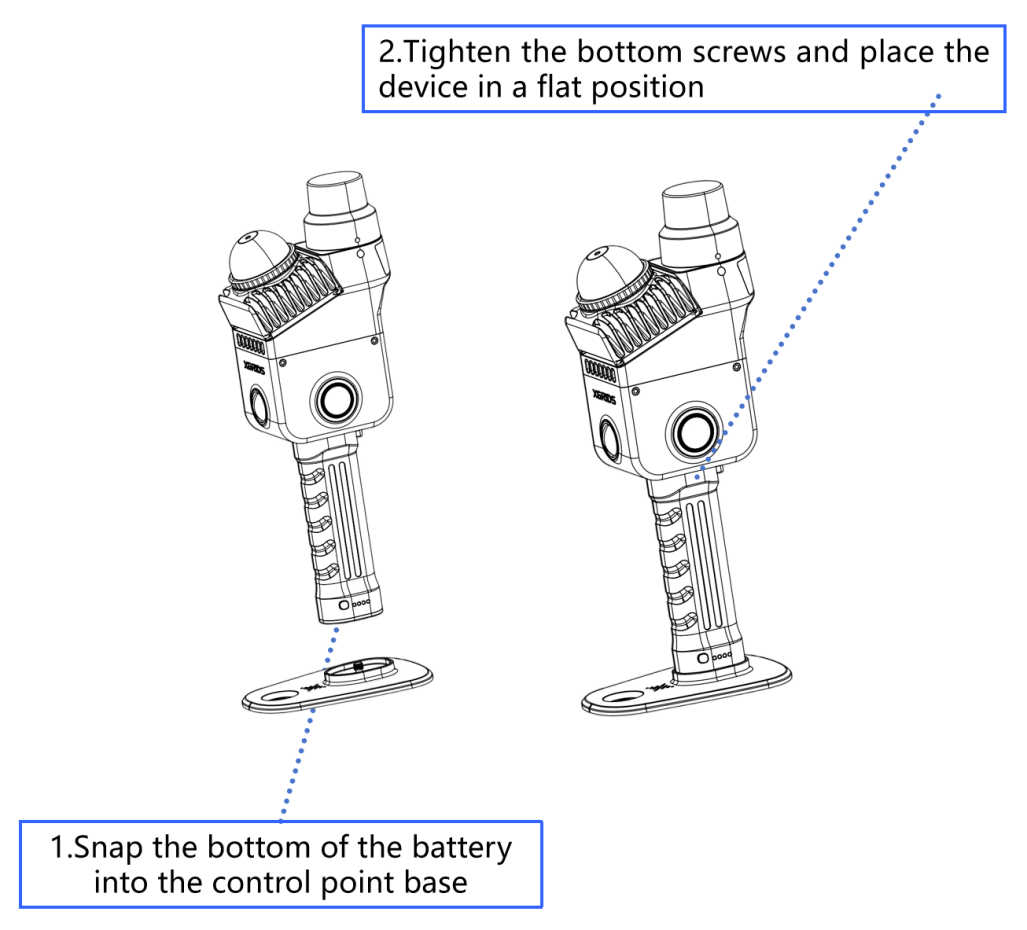
There is a threaded hole at the bottom of the battery handle. Clip the device into the base, lock the bottom bolt, and place the device on a flat surface.
Battery Charging
Use the provided charging cable to connect the charging adapter to the battery to start charging. A full charge takes about 2 hours. During charging, the indicator light shows the current battery level.

| Indicator Light | Battery Level |
|---|---|
 | 0–24% |
 | 25%–49% |
 | 50%–74% |
 | 75%–99% |
Function Key Operation
| Function | Button Operation | Device Status |
|---|---|---|
| Power On | Press and hold for 4 seconds | The indicator light changes from slow-flashing blue to solid green, and the device enters standby mode. |
| Power Off | Press and hold for 4 seconds | In standby mode, press and hold for 4 seconds. The solid green light changes to flashing white while the system saves data; the device powers off once the light turns off. |
| Start Scanning | Double-click | In standby mode, double-click the button. The light changes from solid green to fast-flashing green, then slow-flashing green; the LiDAR starts rotating and the device enters scanning mode. |
| Stop Scanning | Double-click | In scanning mode, double-click the button. The light changes from slow-flashing green to fast-flashing green, then solid green; the LiDAR stops rotating and the device returns to standby mode. |
| Control Point Collection | Single-click | In scanning mode, single-click the button. The light stays on for about 1 second, then returns to slow-flashing green, indicating the control point was recorded successfully. |
| Switch to USB Mode | Single-click → single-click again while white light is on | In standby or USB mode, single-click; the white light stays on for up to 3 seconds. Single-click again during this time to switch. If no action is taken within 3 seconds, the device keeps its current mode. |
Indicator Light Description
| Light Status | Meaning |
|---|---|
| No light | Device not started |
| Slow-flashing green | Scanning mode |
| Solid green | Standby mode |
| Solid blue | USB mode |
| Solid yellow | Device not activated |
| Solid red | System error |
| Slow-flashing blue (~30s) | Powering on |
| Solid white | Switching between standby and USB mode |
| Fast-flashing green | Scan starting / stopping |
| Alternating red and green | Firmware upgrading |
Data Transfer
- In standby mode, connect the device to a computer with the provided USB 3.1 cable.
- Switch to USB mode via LixelGO or the button shortcut.
- Once the computer recognizes the device, you can copy data.
Note
- USB mode automatically disables after a restart.
- After enabling USB mode, if you want to continue scanning you must manually exit USB mode or restart the device.
- Using a non-standard USB cable may slow down transfer speeds.
Basic Usage Specifications
The Lixel K2 is a high-precision surveying device. Follow the specifications below when operating it.
- Handle gently and avoid impacts
Dropping or hitting the device may reduce measurement accuracy, cause malfunctions, or even complete damage.
- Check that connections are secure
Before use, confirm that the base and battery are tightened and locked to prevent the device from falling accidentally.
- Protect against water and dust
- Protection rating IP54 (splash- and dust-resistant).
- Do not use in heavy rain, standing water, or dusty environments.
- Clean with a soft dry cloth or the provided cleaning cloth. Keep the LiDAR and lens areas clean and do not touch them directly with your hands.
- Avoid overheating
- Do not block the ventilation openings during use.
- Avoid touching the heat-dissipation areas with your body.
- The device automatically shuts down to protect itself when it overheats; wait for it to cool down before using it again.