Measure
The Measure tool gets coordinate, distance, or area data, with real-time calculation, unit switching, and professional measurement display.
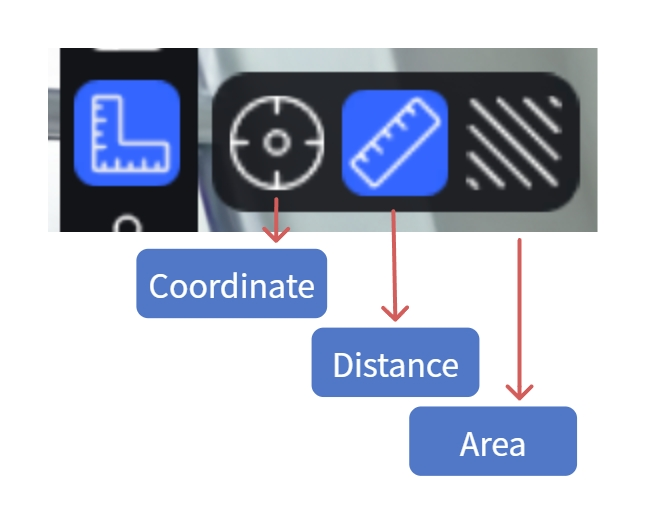
Measure tool
Workflow
1. Activate Measurement
Click Measure in the left toolbar.
2. Choose a Measurement Type
Coordinate:
- Click Coordinate.
- Click a point on the model surface.
- The point's coordinates (X/Y/Z) display.
Note: With RTK data in the scene, absolute coordinates display.
Distance:
- Click Distance.
- Click the first point.
- Click the second point; the distance displays in real time.
- Double-click to finish.
- Right-click to cancel.
Area:
- Click Area.
- Click multiple points in turn (at least 3).
- Click the first point or double-click to close.
- Right-click to cancel.
3. Delete a Measurement
- Hover over the measurement data and click Delete.
- Or select the entry in the asset list and press Delete, or right-click → Delete.
4. Text Note
Add a note beside a measurement result; it shows when the measurement is exported to PDF.
- Hover over the result number.
- Click the "T" icon to enter input.
- Type the note (≤50 characters).
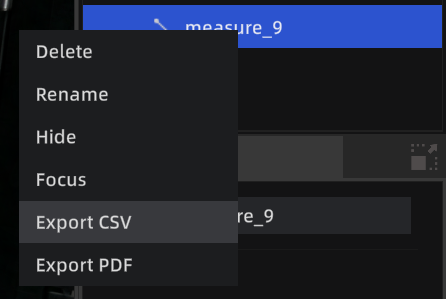
5. Export Measurement
- In the asset list, select measurement entries (multi-select supported), right-click → Export, choose .csv or .pdf.
- Or include measurement data in a scene report: in Scene Report, check measurement data, confirm, then export the report PDF in preview mode.
Export measurement
Measurement Aids
Customize and save aid preferences in Settings, or toggle them with shortcuts during measurement.
Auxiliary Axis
Shows X/Y/Z guide lines during measurement; points snap to an axis for precise horizontal or vertical distances.
- Shortcut: Ctrl to toggle
Corner Detection
Auto-detects model edges and corners, showing a "□" marker on detection for precise edge and corner picking.
- Shortcut: Tab to toggle
Units
Switch measurement units (metric/imperial) in Settings → General. Enabling Professional measurement also shows X/Y/Z component values.