XGRIDSDocs
  • 简体中文
  • English
  • 繁體中文
  • 日本語
  • Deutsch
  • Español
  • Italiano
  • 简体中文
  • English
  • 繁體中文
  • 日本語
  • Deutsch
  • Español
  • Italiano
  • PortalCam

    • Product Overview
    • Basic Operation
    • Using the LCC Scan App
    • Maintenance and Care
    • FAQ
  • Lixel K Series

    • Lixel K1

      • Product Overview
      • Basic Operation
      • Device Activation and Connection
      • Scanning Workflow
      • Acquire Point Cloud Data with Absolute Coordinate
      • Map Fusion
      • Route Planning Suggestions for Typical Scenes
      • Precautions
      • FAQ
    • Lixel K2

      • Product Overview
      • Basic Operation
      • Device Activation and Connection
      • Scanning Workflow
      • Acquire Point Cloud Data with Absolute Coordinate
      • Map Fusion
      • Route Planning Suggestions for Typical Scenes
      • Precautions
      • FAQ
  • Lixel L Series

    • Lixel L2 Pro

      • Product Overview
      • Basic Operation
      • Device Activation and Connection
      • Scanning Workflow
      • Acquire Point Cloud Data with Absolute Coordinate
      • Measure Point
      • Appendix
      • FAQ
  • Lixel Studio

    • Version and Copyright
    • Installation and Activation
    • Software Interface
    • File Operations
    • Project Processing
    • Tools
    • 2D Drawing
    • Applications
    • Settings
    • Device Connection
    • FAQ
  • Lixel CyberColor

    • LCC Studio

      • Getting Started
      • Version and Updates
      • Download and Installation
      • Interface Overview and Navigation
      • Pre-Reconstruction Work
      • Model Reconstruction
      • Single Model Reconstruction
      • Map Fusion
      • Aerial-Ground Map Fusion
      • Aerial Reconstruction
      • My Models
      • Other Features
      • Settings and Account
      • Video Reconstruction
      • FAQ
    • LCC Scene Editor

      • Version & Updates
      • Account & Login
      • Product Overview & Home
      • Editor Interface
      • Scene Navigation Modes
      • File
      • Settings
      • Edit Operations
      • Window
      • Global Toolbar
      • Assets & Properties
      • Left Toolbar
      • Viewpoints
      • Portal
      • Skybox
      • Annotations
      • Measurement
      • Flythrough
      • Scene Report
      • 3D Layout
      • Preview Mode (Viewer)
      • Help
      • FAQ
      • Spawn Point
    • LCC Model Editor

      • Version and Updates
      • User Guide
      • Overview and Interface
      • File Operations
      • Selectors
      • Editing Models
      • Measurement
      • Color Grading
      • Asset Management
      • Settings and Help
      • FAQ
    • 04-capture-guide

      • Overview
      • Capture Devices Overview
      • General Capture Principles
      • Indoor Scene Capture
      • Outdoor Scene Capture
      • Large-Scale Capture (Map Fusion)
      • Aerial-Ground Map Fusion Capture
      • Object Capture
      • People Capture
      • Video Reconstruction Capture
      • HD Enhancement
      • Control Points (Lixel P1)
      • FAQ and Troubleshooting
    • Version History

Portal

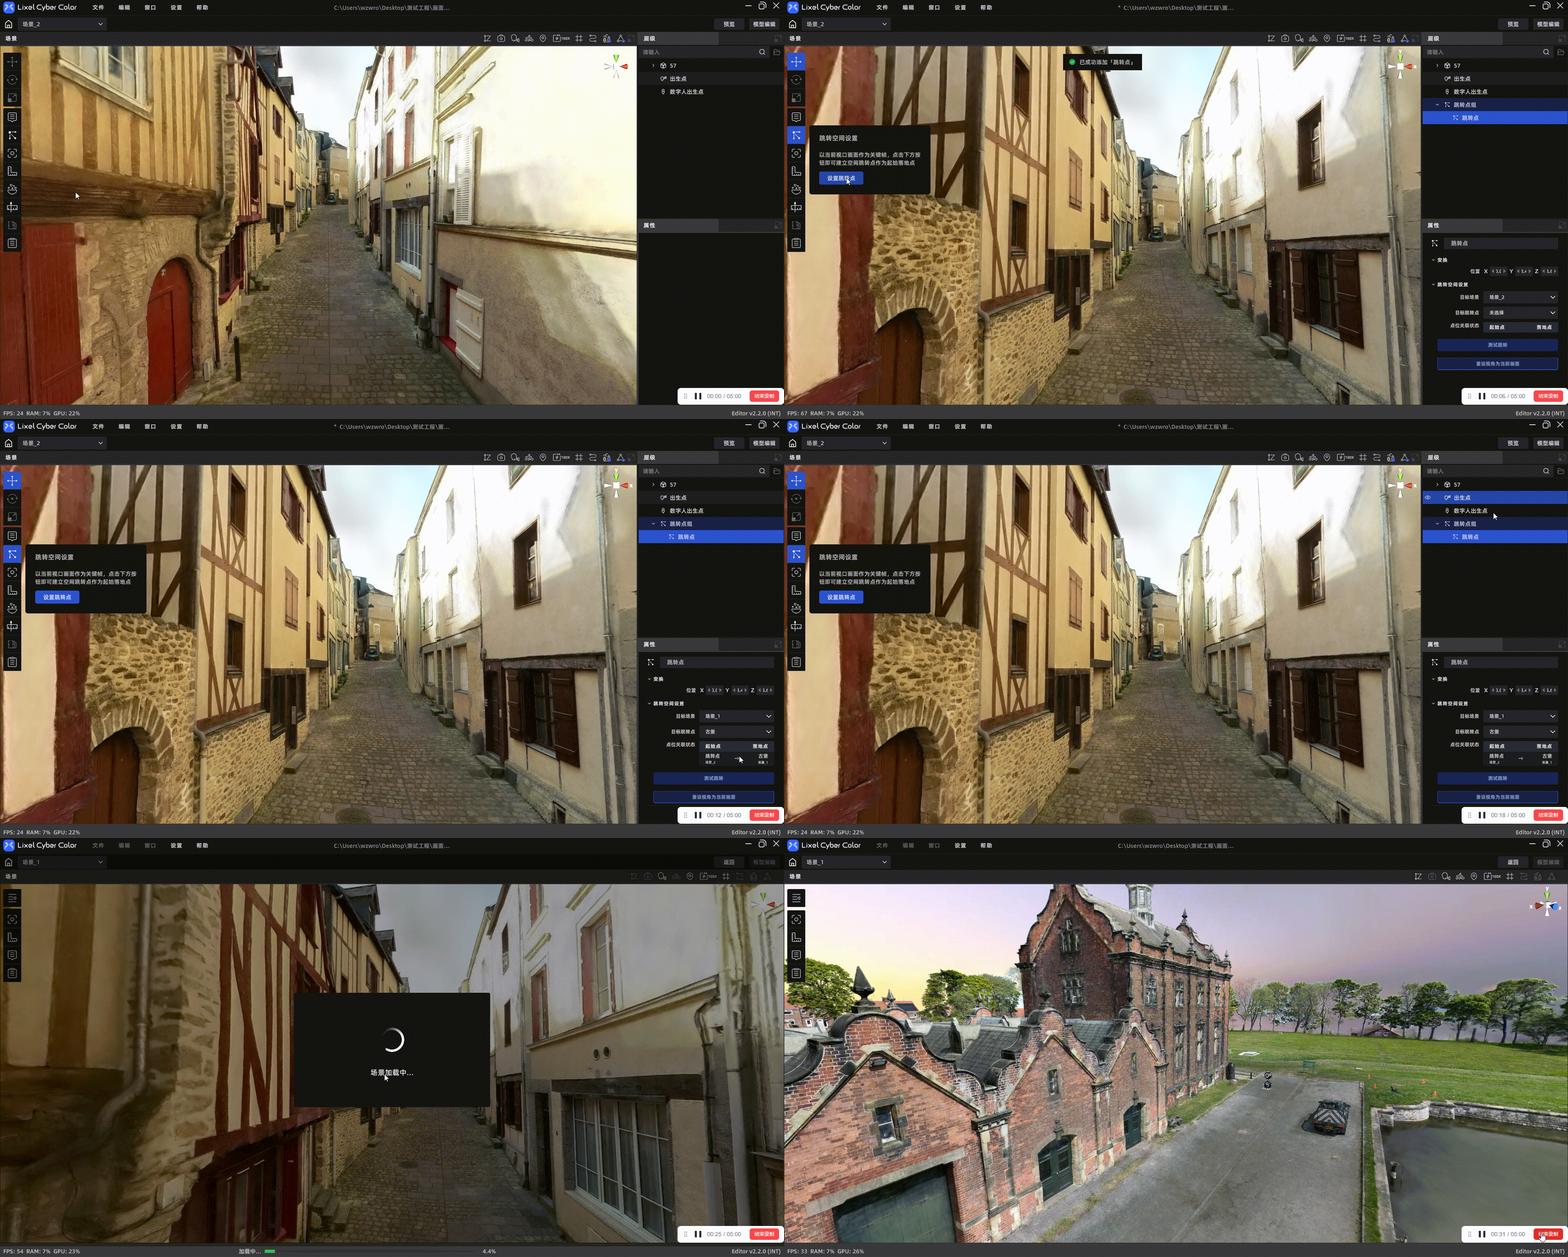
New in V2.2. Place portals at any location in the scene, configure jump targets (scene + landing point) via the properties panel, and enable same-scene instant teleportation or cross-scene spatial jumps. End users trigger them by clicking after publishing.


Placing a Portal
Portal

Portal

  1. Click Portal in the toolbar
  2. Select the target position and orientation in the scene, then click Set Portal
  3. After the portal is created, the current camera angle is automatically captured as the orientation preview
  4. In Preview Mode, you can test the jump effect

Configuring a Portal (Properties Panel)

After selecting a portal, the properties panel shows the following options:

SettingDescription
Target SceneSelect the target scene from the dropdown (includes the current scene and all other scenes)
PortalAfter selecting a scene, the dropdown refreshes to list that scene's portals; select the landing target
NamePortal name (≤50 characters)
Update Preview ImageUpdate the portal position, orientation, and re-capture a screenshot using the current camera angle

Note: You must first place a portal in the target scene before you can link to it.


Two-Way Portal

When two portals each designate the other as their target (A→B and B→A), the system automatically detects the bidirectional link and displays a Bidirectional Link badge on both portals.

  • Two-way portals must be configured manually on each end; the system does not create reverse links automatically
  • When either end is modified or the link is removed, the Bidirectional Link badge is removed from both

Portal Interaction

  • Trigger: Mouse click (click-to-trigger only; proximity auto-trigger is not supported)
  • Supported mode: Free Mode (SelfMode); portals are hidden in other modes
  • Same-scene jump: Instant teleport — camera arrives immediately
  • Cross-scene jump: After loading completes, the camera lands at the target position with the orientation set by the landing point
Prev
Viewpoints
Next
Skybox